A television can create a polished focal point, yet its cables often form a dark, tangled bundle beneath the screen. Power cords, HDMI leads, gaming wires, and soundbar connections compete for attention. That clutter is becoming more common. Deloitte’s 2024 Connected Consumer Survey reports that U.S. households own an average of 21 connected devices. More devices usually mean more cables.
This guide explains How to hide messy cables around a TV stand without damaging walls or creating unsafe connections. It focuses on practical methods, including cable sleeves, adhesive raceways, rear-mounted power strips, and intentional furniture placement. The Electrical Safety Foundation International recommends avoiding overloaded outlets and damaged cords, so appearance should never replace electrical safety. Keep ventilation openings clear. Leave power adapters accessible.
Professional organizer Andrew Mellen offers a useful principle: “Clutter is nothing more than postponed decisions.” That idea applies directly beneath a television. Each cable needs a purpose, route, and storage position. Labeling both ends can save several minutes during troubleshooting. Small details matter.
Still, cable concealment is not magic. A low cabinet may hide wires from standing height but reveal them when children crawl nearby. Adhesive products can also weaken on dusty surfaces. This guide acknowledges those imperfections and encourages careful testing before final installation. The goal is not a perfectly invisible system. It is a safer, calmer, and easier-to-maintain entertainment area.
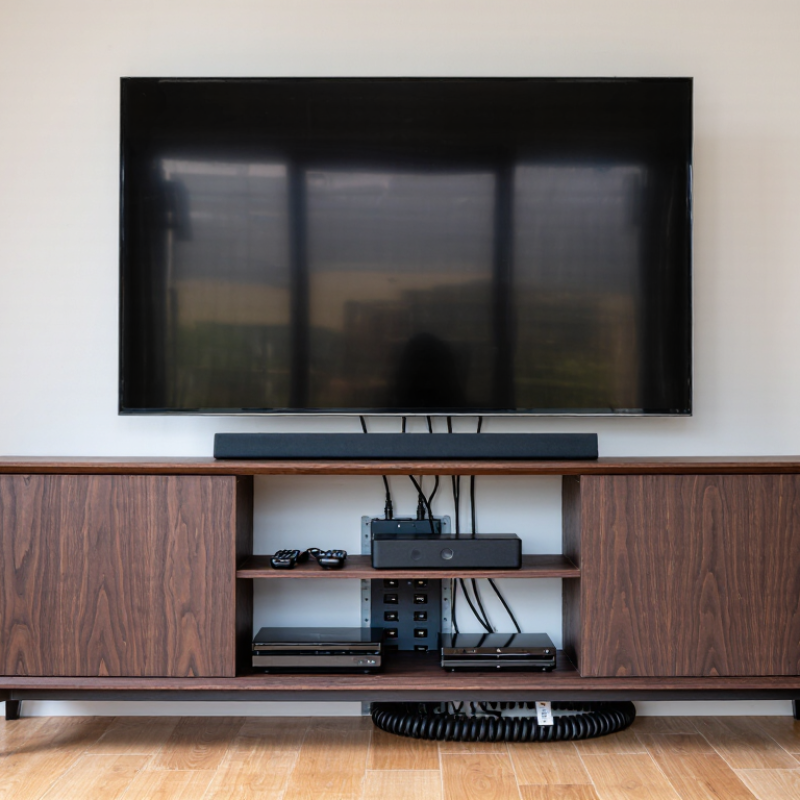
A neat TV setup begins with an accurate cable inventory. List every power cord, extension cord, HDMI lead, coaxial cable, Ethernet cable, and speaker wire. NEC Article 400 primarily governs flexible cords and cables, not every low-voltage signal cable. That distinction matters. A power cord is not a substitute for permanent wiring. Do not hide it inside walls, under carpets, or through closed doorways unless the installation method is specifically permitted. Shortcuts can look tidy and still create heat or mechanical damage.
Check each cord’s markings, grounding path, condition, and rated capacity. Avoid pinching cables behind the stand. Leave a gentle service loop, about 15 to 30 centimeters, near each connection. Use an open, accessible raceway for visible routing. Keep power cords separated from signal cables where practical, reducing clutter and possible interference. Never bundle warm power supplies tightly with unused cables. Small details matter.
NFPA’s Home Fires Involving Electrical Distribution and Lighting Equipment report found an estimated 35,150 U.S. home fires annually from 2015–2019. These fires caused about 470 civilian deaths, 1,100 injuries, and 1.3 billion dollars in direct property damage. The report does not blame television stands specifically. Still, it supports careful inspection of overloaded or damaged cords. My own practical weakness is assuming a cable is safe because it looks new. That assumption needs challenging. For uncertain installations, ask a qualified electrician and confirm local code requirements.
Keep the bend radius at least four times the cable’s outside diameter. A 6 mm cable needs a curve of at least 24 mm. Avoid sharp corners behind the cabinet.
Route cables around furniture legs, not underneath them. Use removable clips instead of tight ties. Inspect the jacket for dents after moving the stand. I once tightened a bundle too much. That reduced flexibility.
Choose a safety-tested channel with documented capacity for the combined cable load. Check its maximum fill, weight rating, and mounting method. Measure every cable before cutting the channel. A wide channel is not automatically suitable.
Separate them where practical. If they must cross, cross them at a right angle. Avoid running power cables tightly beside signal cables for long distances. Keep power cables away from heat sources.
Leave a service loop of about 150 mm for each cable. Use a gentle curve, not a folded loop. Thicker cables or ventilation needs may require more space. Measure the actual route.
Yes. Label both ends with simple names, such as “power” or “HDMI-1.” Take a photo of the connections before moving the screen. Labels can loosen. Photos help later.
Test the picture, sound, network connection, remote response, and power stability. Move each connector slightly during testing. Test twice. A cable can look fine while its connector fails under movement.
Leave enough slack for careful cleaning and future equipment changes. Do not pull cables by their connectors. Check that furniture does not press against the channel or service loop. Looks tidy. Still risky.
No. Hiding cables only improves appearance. Safe routing still requires gentle bends, suitable channels, and accessible connections. Inspect the route again after moving the furniture. I once checked appearance first. That was the wrong priority.
How to hide messy cables around a TV stand starts with a careful inventory of every power and signal cable. Check each cable’s purpose, condition, and routing needs while keeping power cables consistent with applicable electrical safety requirements, including NEC Article 400 considerations. Plan the route before attaching anything, allowing at least four times the cable diameter for bends to prevent stress and signal problems. Keep mains wiring physically separated from low-voltage connections in line with NEC Article 725 guidance.
Use sturdy, safety-rated cable channels that can accommodate the combined cable load without crushing or overheating the wires. Arrange cables neatly, avoid sharp bends, and secure them without over-tightening. Label both ends of important cables so future adjustments are easier. After installation, test power, audio, video, and network connections to confirm reliable operation. Finally, leave approximately 150 mm of service loop near the TV stand and connected devices, providing enough slack for maintenance, cleaning, or equipment replacement without rebuilding the entire route.

 Lyte Home